 Blackbody
Tutorial: your first fire shot#
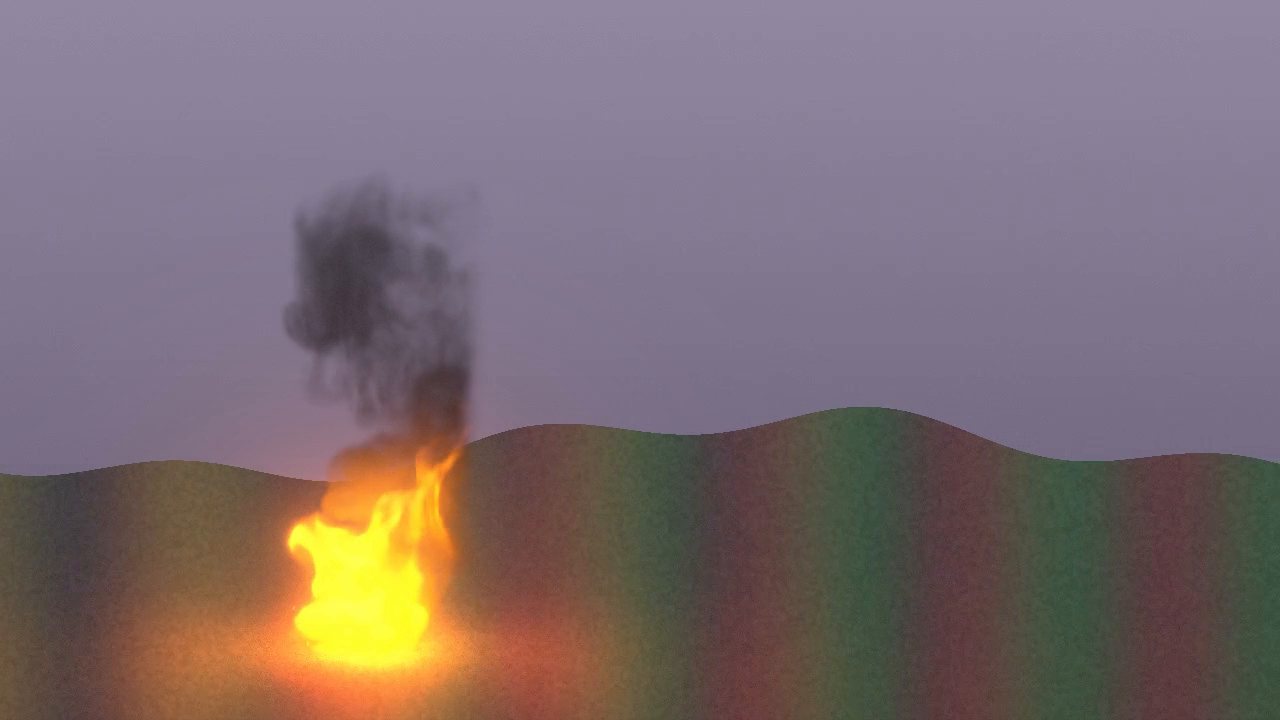
In this tutorial you put a campfire into a short panning shot, match it to the footage, make it flare up, and render a finished composite and a fire element for compositing. Then you render the same shot from the command line, and swap the fire for water.
It takes about 30 minutes. You learn the steps every Blackbody shot goes through; the guides cover each one in depth.
Before you start#
You need:
- Blackbody running. See Install and first steps.
- A shot to work in. Any clip with some ground in it works. To follow along exactly, make the practice plate the tutorial uses: a 3-second, 1280×720, 30 fps dusk landscape with a slow pan and a sound track. From the Blackbody folder:
bash
  .venv/Scripts/python tools/make_test_footage.py out/practice_plate.mp4
On macOS or Linux use .venv/bin/python. (The generator is part of the source, not the standalone app. With the standalone app, use a clip of your own.)
The numbers in this tutorial are for the practice plate. With your own footage, use them as a starting point and trust your eye.
1. Find your way around#
Open Blackbody. It opens in Build: an empty stage with a camera of your own, and a card on it to start building with fire, water, cloth, smoke, snow or an object. This tutorial puts a preset into footage instead, which happens in Shot, the other workspace in the header (Tab switches between them). Importing footage takes you there.
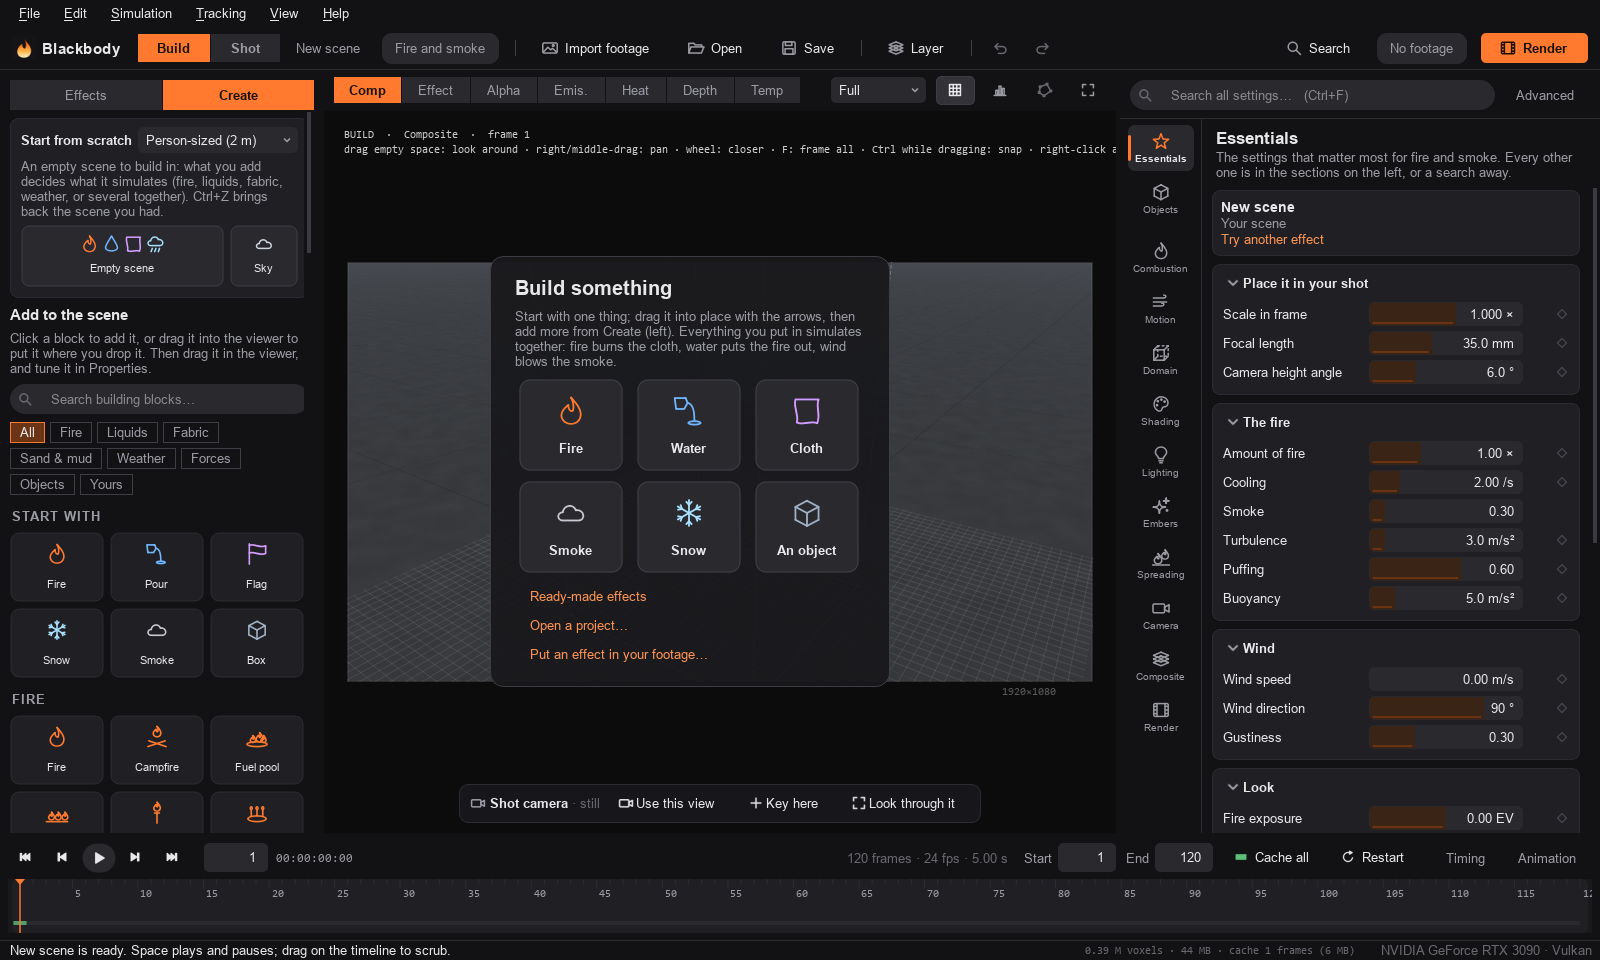
Across the top, the header holds what you do most: Import footage, Open, Save, undo and redo, and Render. Under it, the window has five parts. You will use all of them:
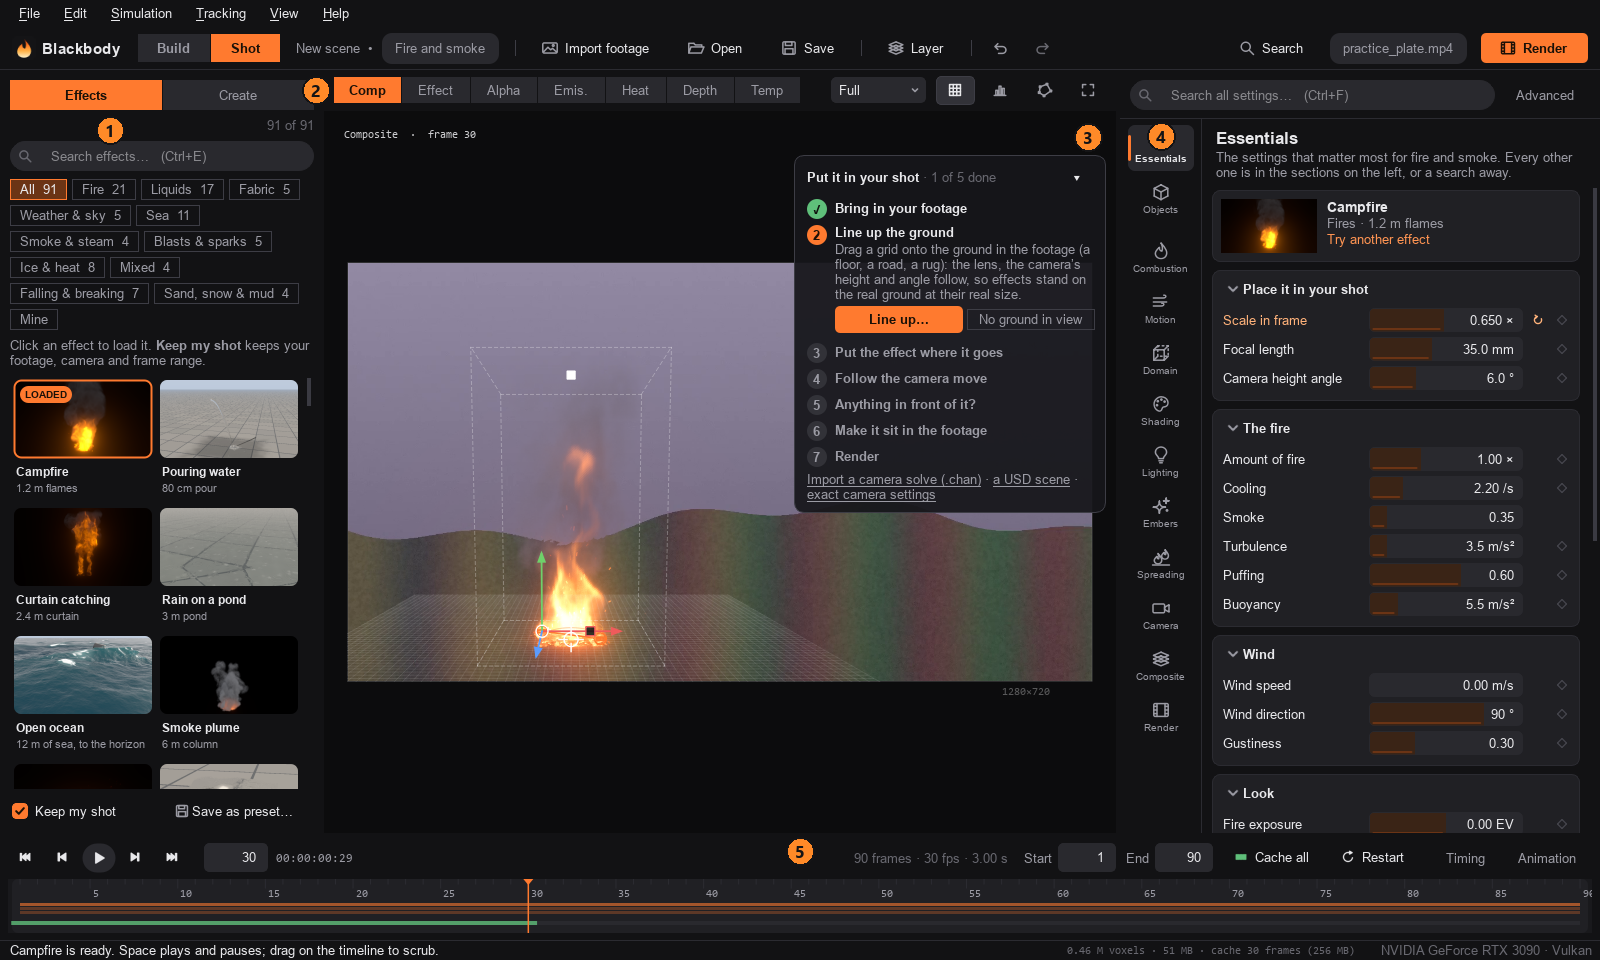
- Effects and Create. Effects has the built-in fires, smoke, sparks, steam, liquids, seas and skies, in categories, with a search box (Ctrl+E). Create is for building your own from an empty scene; this tutorial starts from a preset.
- View bar. What the viewer shows: the composite, the fire over black, its alpha, and passes such as heat and depth (keys 1 to 7). Preview sets the resolution of the live preview, Guides shows or hides the handles and the simulation box (G), and Stats shows the simulation grid, the size of one cell and how long each frame took.
- Viewer. Your frame. The label at the top left says which view and frame you are looking at.
- Properties. The settings, on pages picked from the bar down its left side: Essentials (the settings that matter most for this kind of effect), Objects (the emitters, colliders, lights and fabrics in the shot, and the settings of the one selected), then one page per section: Combustion, Motion, Domain, Composite and so on. The search box at the top (Ctrl+F) finds any setting by name. Tick Advanced for expert settings.
- Timeline. Play controls, the current frame, the frame range, and a bar underneath that turns green as frames are simulated and cached. Keyframes show as diamonds.
The status bar at the bottom shows the GPU Blackbody is using.
2. Import your footage#
Choose File › Import footage (Ctrl+I) and pick out/practice_plate.mp4.
The header now names the clip, practice_plate.mp4; hover over it for the details (Video · 1280×720 · 30.000 fps · 90 frames · h264 · 8 bit · audio). The output size, frame rate and frame range (1 to 90) have changed to match it, so there is nothing to set up, and the viewer is in Shot, looking through the footage's camera. (You can also drop a clip onto the window.)
A card at the top right of the viewer, Put it in your shot, walks through the same steps as this tutorial. This practice plate has no rectangle on the ground to line up, so this tutorial pins the fire in 2D (step 4). With your own footage, Line up the ground on the card (or Ctrl+Shift+L) gives the effect the footage's camera, at real size: see Put an effect in your shot.
3. Pick a fire#
In Effects, check that Keep my shot (under the thumbnails) is ticked, then click Campfire.
Keep my shot swaps in the new fire but keeps your footage, frame range, output settings and where the fire sits in the frame. Untick it to load a preset exactly as it was made. Like every change in Blackbody, loading a preset can be undone with Ctrl+Z.
4. Place it#
With Guides on, the fire has two handles:
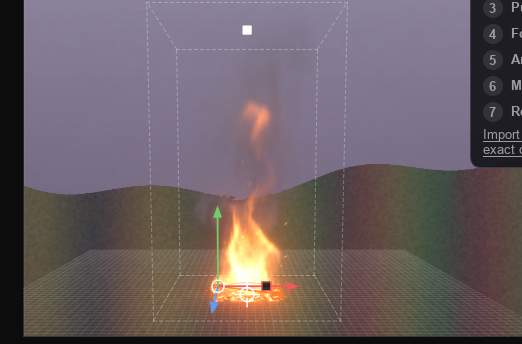
- The ring is the base of the fire. Drag it onto the ground in the left third of the frame, near the bottom.
- The square is the top of the simulation box. Drag it down to make the fire a little smaller in the frame.
To type exact values instead, click Camera in the bar down the left of Properties, and under Placement set Base X to 0.30, Base Y to 0.90 and Scale in frame to 0.65. (The left of the practice plate has the most texture in the ground, which you will need for tracking in step 8.)
Two more moves to know:
- Alt-drag in the viewer walks the camera around the fire (Orbit and Camera height angle); Alt + right-drag changes its Distance. Distance changes the perspective, not the size: the fire stays pinned to the ring at the size you set.
- Mouse wheel zooms the viewer, middle-drag pans it and F fits it again. These change only your view, not the shot.
With your own footage: set Camera › Focal length and Sensor width to the lens and camera the shot was filmed with, Camera height angle to how much the camera looks down, and Roll to match a tilted horizon.
5. Play it#
Press Space.
Blackbody simulates the fire as it plays: fuel burns, hot gas rises and swirls, smoke drifts. The campfire starts with 2.5 seconds of pre-roll (Domain › Pre-roll), simulated before frame 1, so it is already burning when the shot starts. The viewer says simulating… frame N while it catches up.
As frames are simulated, the bar under the timeline turns green. Green frames are cached: scrubbing back over them is instant.
What happens when you change a setting depends on what it controls:
- How it looks (Shading, Lighting, Camera, Composite): the cached frames are redrawn, with no re-simulation.
- How it moves (Combustion, Motion, the emitters): with Simulation › Live tweaking on (the default), the simulation keeps running with the new values, and the cache is dropped. Changing the size or resolution of the box restarts it.
Simulation › Cache the frame range (Ctrl+Shift+C, or the green button at the right of the timeline) simulates the whole shot in one go. If playback is slow, set Preview in the view bar to Half or Quarter.
6. Look at it the way a compositor would#
Pause on a frame and press 1, 3 and 5 in turn:

- Composite (1) is the fire in your footage.
- Alpha (3) is how much the fire hides what is behind it. Smoke is solid; flame is mostly light, so it has little alpha. This is what your editor or compositing app receives.
- Heat (5) is the hot air that makes the footage shimmer. It drives the heat haze.
Fire over black (2) is useful for judging the flames alone. Press 1 to go back to the composite.
7. Make it sit in the shot#
In Properties, click Composite and set:
| Setting | Value | What it does |
|---|---|---|
| Heat haze | 1.2 | Shimmer in the footage behind and above the fire |
| Fire light on footage | 0.9 | The fire lights up the ground around it |
| Grain | 0.25 | Film grain on the fire, to match the noise in the plate |
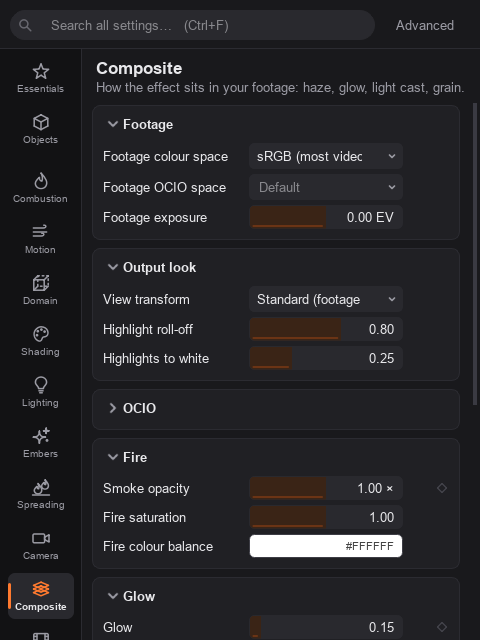
Then click Motion and set Wind speed to 0.6 m/s, a light breeze. The flames and smoke now lean to screen right (Wind direction 90°). Wind changes the simulation, so the fire re-simulates from here. A little wind goes a long way on a fire this size: much more and the flames lie down along the ground.
A few things make settings quicker to work with:
- Drag a number sideways to change it (hold Shift for fine steps), or click it to type a value.
- Drag a setting's name to scrub it too. Double-click the name for its default.
- A setting you have changed from the preset shows its name in orange; the ↺ next to it puts the preset's value back.
- Search (Ctrl+F) finds a setting anywhere: type haze or wind and change it right there.
- Hover over a setting for a tooltip that explains it, often with typical real-world values.
- Too bright or too dim? Shading › Fire exposure is in stops, like a camera.
You do not need to light the smoke: Lighting › Match ambient to footage is on, so the smoke picks up the colour and brightness of the plate.
8. Track the camera move#
Play the shot. The camera pans, but the fire stays in the same place in the frame, so it slides across the ground.
Choose Tracking › Track (Ctrl+T). With the fire pinned in 2D, Blackbody follows the patch of ground under the ring through the whole shot, forwards and backwards from the current frame, and the status bar reports Tracked 90 frames. The tracked path appears as a thin green line through the ring (short here, because the pan is slow), and the fire now stays put on the ground:
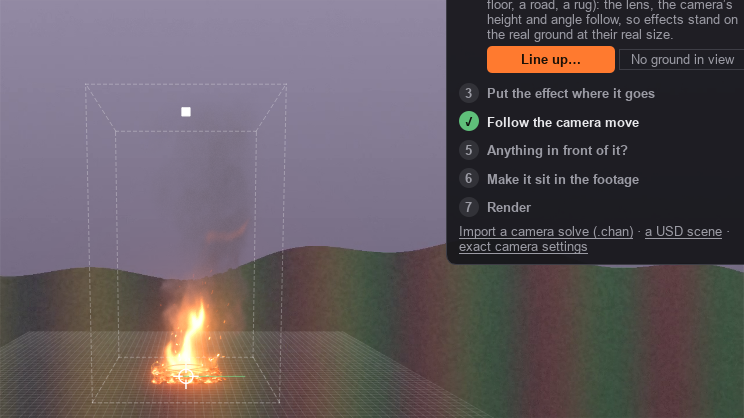
If the fire should sit slightly elsewhere, drag the ring: the whole track moves with it. Tracking › Clear track removes the track.
The tracker follows one point in 2D, and needs texture under the ring (it tells you if there is too little). For shots with a strong change of perspective, line up the ground first: then Track works out the camera's whole move in 3D, in metres (see Following the camera move). You can also import a camera solve with File › Import camera track (.chan) (see Moving shots).
9. Make it flare up#
Any setting with a ◆ next to it can be animated. Make the fire flare up as if someone threw fuel on it:
- In Properties, click Combustion.
- Go to frame 40 (type it in the frame box at the left of the timeline, or use the arrow keys).
- Click the ◆ next to Master fuel. The diamond fills in: there is a key at 1.00 on this frame.
- Go to frame 55 and set Master fuel to 2.5. Because the setting is now animated, this adds a second key by itself.
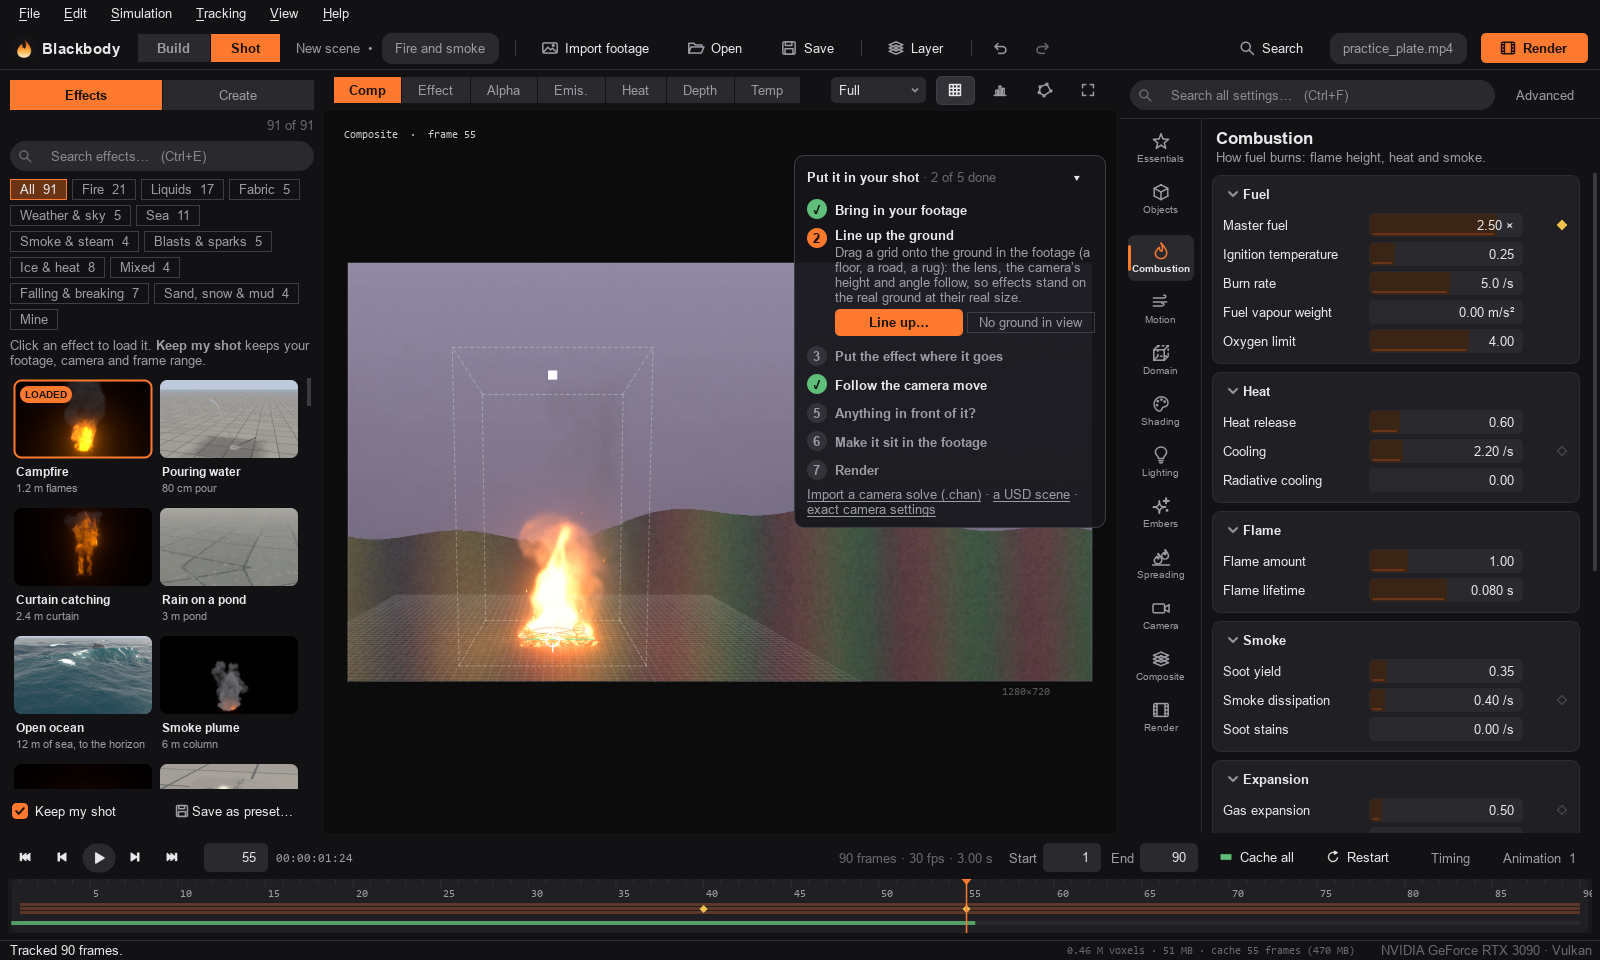
The keys also show in the animation editor (Animation, at the right of the timeline), where you can drag them in time and change how they ease.
Play it: after frame 40 the fire starts to swell. Fuel takes a moment to burn and rise, so the flames keep growing after the last key and roar by the end of the shot. Master fuel scales every emitter at once, which makes it the quickest way to ignite, grow or put out a fire. Right-click a ◆ to remove a key or clear the animation.
10. Save and render#
Choose File › Save (Ctrl+S) and save the project as campfire_shot.bbfire in the out folder, next to the practice plate. The project remembers the footage; if you move both, Blackbody finds the clip next to the project.
Choose File › Render (Ctrl+M):
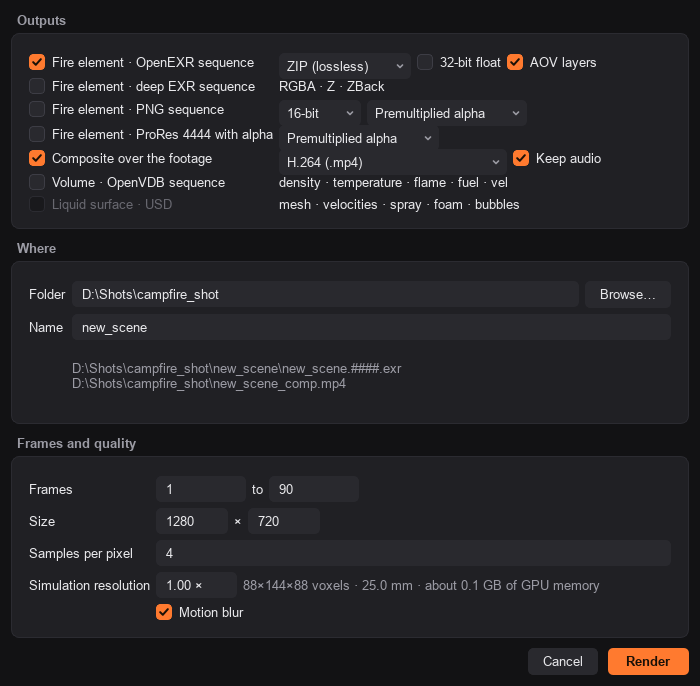
- Under Outputs, tick: - Fire element · OpenEXR sequence: the fire alone, with alpha and extra layers, for Nuke, After Effects, Fusion or Resolve. - Composite over the footage, and choose H.264: the finished shot, with the plate's sound.
- Under Where, pick a folder. Name starts the file names (
campfire, after the preset), and the files it will write are listed underneath. - Under Frames and quality, leave the range at 1 to 90. Simulation resolution shows the grid size and roughly how much GPU memory the final render needs; lower it if your GPU runs out.
- Click Render.
The final render simulates again at full resolution with 4 samples per pixel and motion blur, so it takes longer than playback: about 20 seconds for this shot on an RTX 3090. A progress window shows each frame as it finishes; Open folder takes you to the files:
campfire/campfire.0001.exr….0090.exr: scene-linear, premultiplied RGBA, withemission,glow,heatanddepthlayers. Useheatto drive a displacement if you want to redo the haze in comp.campfire_comp.mp4: the finished shot.
For a single frame to check or share, File › Export this frame (Ctrl+Shift+E) saves the current frame at final quality, as a PNG of what the viewer shows or as an EXR fire element.
11. Render from the command line#
The project file renders without opening the app, which is how you queue shots or use a render farm.
Open a terminal in the Blackbody folder. The command depends on how you run Blackbody:
- From source:
.venv/Scripts/python -m blackbody(on macOS and Linux,.venv/bin/python -m blackbody) - Standalone:
dist/Blackbody/blackbody-cli.exe(it sits next toBlackbody.exe)
The examples below write blackbody for short. A quick draft of the first 30 frames, to check the shot:
blackbody render out/campfire_shot.bbfire -o out/draft/comp.mp4 --frames 1-30 --draft
The full-quality composite:
blackbody render out/campfire_shot.bbfire -o out/renders/comp.mp4
The output type follows the file extension: .mp4 is an H.264 composite over the footage, .exr a fire element, and #### becomes the frame number. --set changes any setting for one render without touching the project, which makes it easy to try variations (wedges). A version with sootier, darker smoke:
blackbody render out/campfire_shot.bbfire -o out/wedge/soot15.####.exr --set combustion.soot=1.5
To find a setting's command-line name, blackbody settings combustion lists every setting in a section with its default, typical range and the name you see in the app (Soot yield is combustion.soot). A misspelt name stops the render before it starts, with a suggestion. blackbody presets lists the presets. See Command line and render farms in the README for the rest.
12. Swap the fire for water#
Back in the app, click Water at the top of Effects (or type fountain in its search box), then click Fountain jet (with Keep my shot still ticked).
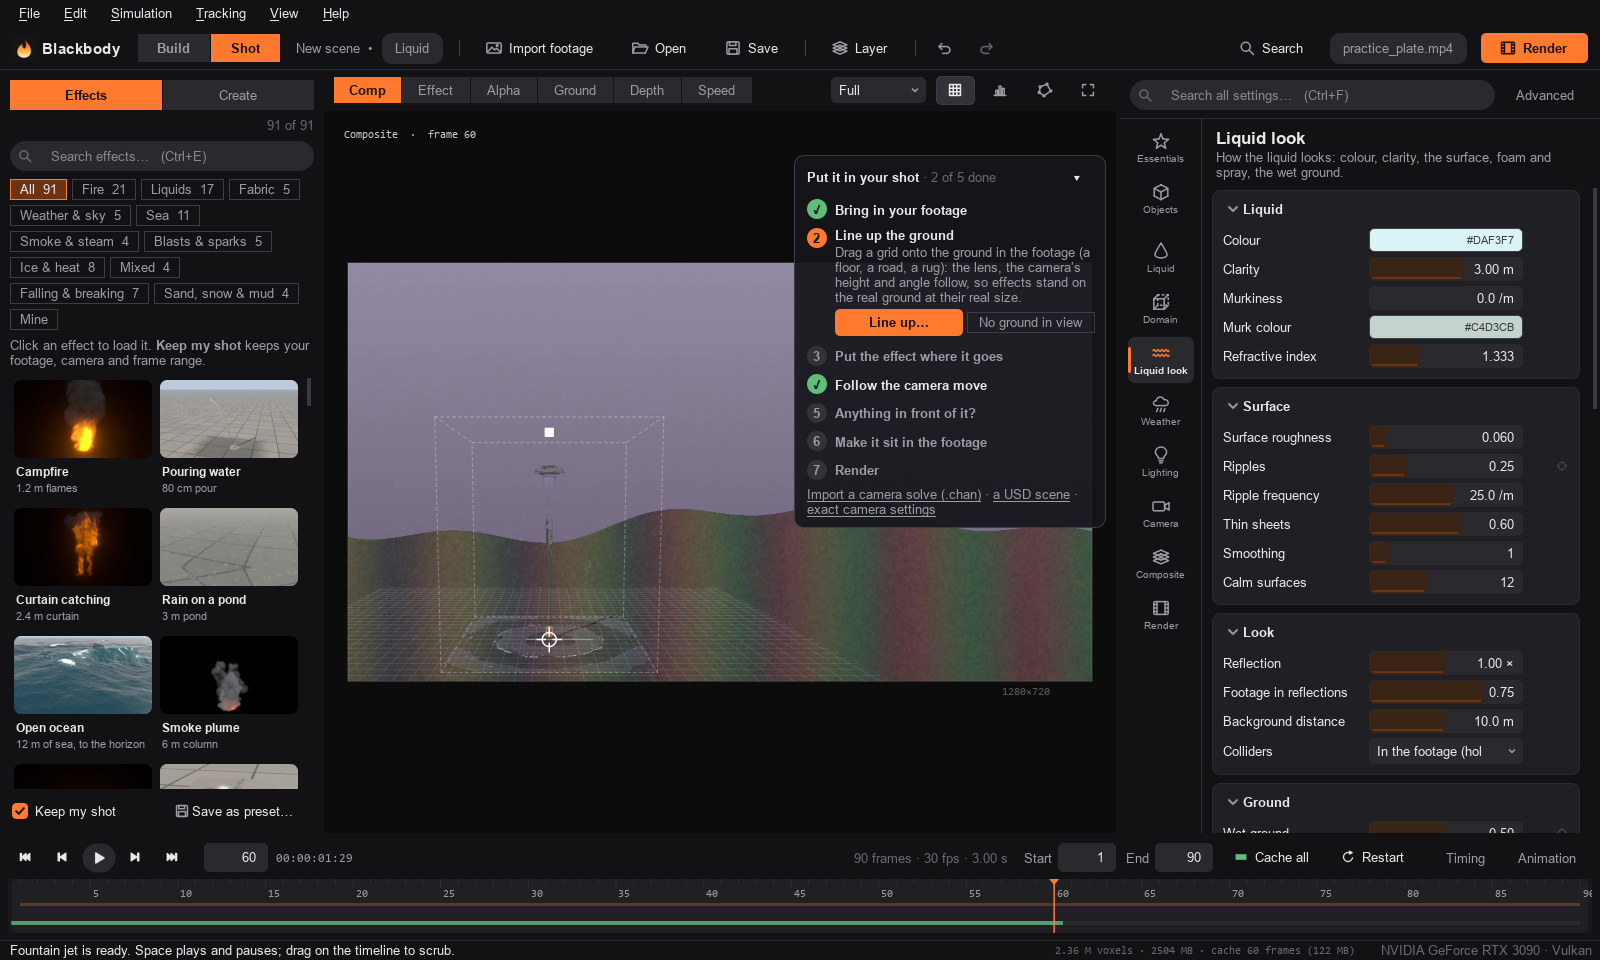
A jet of water now rises from the same spot, breaks up at the top and rains back down, wetting the ground. The placement, track and render settings carried over. Properties changes to match: emitters become Sources, Essentials shows the liquid's main settings, and Liquid (how it behaves) and Liquid look (how it looks) take the place of the fire sections. Try these in Liquid look:
- Colour and Clarity for tea, muddy water or wine
- Wet ground: how much the ground darkens where the water has been
- Background distance: how strongly the footage bends through the water
Liquids are simulated as particles, often millions of them, so they are slower than fire; keep the box tight around the action. Ctrl+Z takes you back to your campfire.
What next#
You have been through every step of a shot: import, pick, place, match, track, animate and render. From here, the guides cover:
- Presets: fires, smoke, sparks, steam, liquids, seas and skies, each a starting point at real-world size
- Fire, smoke and sparks: fire whirls, dousing, spreading fire, burning meshes, coloured flames
- Liquids, the sea, lava, ice and steam, fabric and weather
- Fitting it into your footage: holdouts, fire light, lens, haze and noise
- Moving shots and scene import: camera solves from Nuke, Blender, SynthEyes, 3DEqualizer and PFTrack, and USD scenes
- Outputs: premultiplied or straight alpha, heat distortion in Nuke and After Effects, OpenVDB volumes in Blender and Houdini
- Performance and memory: resolution, GPU memory and render times
To keep a fire you have tuned, click Save as preset… under Effects. It appears under Mine, with a thumbnail of your shot.
To build an effect yourself, open Create (Ctrl+N): start an empty scene and drag in fire, liquids, fabric, weather, objects and lights. See Build your own.
If something goes wrong#
| Problem | Fix |
|---|---|
| Flames or smoke are cut off at the top or sides | The simulation box is too small. Raise Domain › Height (or Width and Depth). |
| Playback is slow | Set Preview to Half or Quarter, or lower Domain › Interactive resolution. |
| The fire slides over the ground | The camera moves: track it (step 8) or import a camera solve. |
| "Too little detail at this spot to track" | Move the ring onto a textured spot or a corner, track, then drag the ring back. |
| The render runs out of GPU memory | Lower Simulation resolution in the Render dialog. |
| Blackbody uses the wrong GPU | See Troubleshooting. |
Something wrong or missing on this page? Edit it on GitHub.