 PCBPro
Install and first steps#
Install PCBPro, find your way around the window, and take a board from an empty project to a file you can order. The tutorial then builds a whole guitar pedal, from the enclosure to the order.
Requirements#
- Windows 10 or 11, 64-bit. The Windows download needs nothing else.
- A graphics card with OpenGL 3.3, for the 3D view. Every card and integrated GPU from the last ten years has it.
- To run from source: Python 3.10 or newer. macOS and Linux run from source too, but haven't been tested as much (see limits).
- For Play live: an audio interface with a guitar input. Everything else in PCBPro works without one.
Install#
The Windows download#
- Download
PCBPro-<version>-windows-x64.zipfrom the latest release. - Unzip it anywhere, for example into
DocumentsorC:\Tools. ThePCBProfolder is self-contained: you can move it or copy it to a USB stick. - Double-click
PCBPro.exe.
The download isn't code-signed yet, so Windows may show "Windows protected your PC" the first time. Click More info, then Run anyway. Each release lists the SHA-256 checksum of the zip, and gh attestation verify PCBPro-<version>-windows-x64.zip --repo gjnail/pcbpro checks that it was built from this repository by GitHub Actions.
To uninstall, delete the folder. PCBPro keeps your own parts and downloads in Documents\PCBPro and its settings in the registry under HKEY_CURRENT_USER\Software\PCBPro; delete those too if you want nothing left behind.
From source#
Get the source, either with Git:
git clone https://github.com/gjnail/pcbpro.git
cd pcbpro
or as a ZIP (on GitHub: Code › Download ZIP), unpacked anywhere. Then start it:
- Windows: double-click
PCBPro.bat. - macOS and Linux: run
./pcbpro.sh.
The first run creates a private Python environment in .venv and installs the dependencies into it (close to 1 GB, a few minutes). After that it starts straight away.
Or set it up yourself:
python -m venv .venv
.venv/bin/pip install -r requirements.txt   # Windows: .venv\Scripts\pip ...
.venv/bin/python -m pcbpro
On Linux, Play live needs PortAudio (sudo apt install libportaudio2 on Debian and Ubuntu).
Building the Windows app yourself. powershell -ExecutionPolicy Bypass -File build_exe.ps1 builds dist\PCBPro\PCBPro.exe with PyInstaller. dist\PCBPro\PCBPro.exe --selftest OUTDIR then checks the build: see Command line.
The start screen#
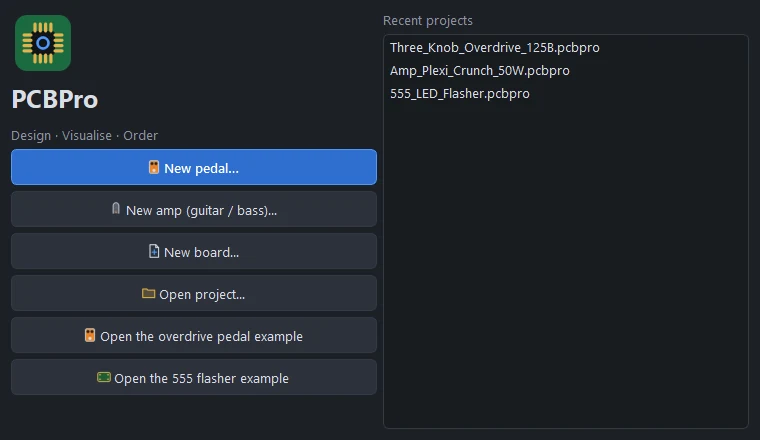
PCBPro opens on a start screen:
- New pedal… runs the new-pedal wizard: pick a Hammond enclosure and your knobs, and get a board shaped for the box.
- New amp (guitar / bass)… opens the Amp Designer: describe the amp you want and get the whole circuit, the numbers and a routed board.
- New board… starts an empty board of the size you choose.
- Open project…, the two examples (a three-knob overdrive and a 555 LED flasher), and your recent projects.
More examples, including six amps and three metal pedals, are under Pedal › Open example, Amp › Open example amp and Amp › Metal pedals. The examples page shows them all.
The window#
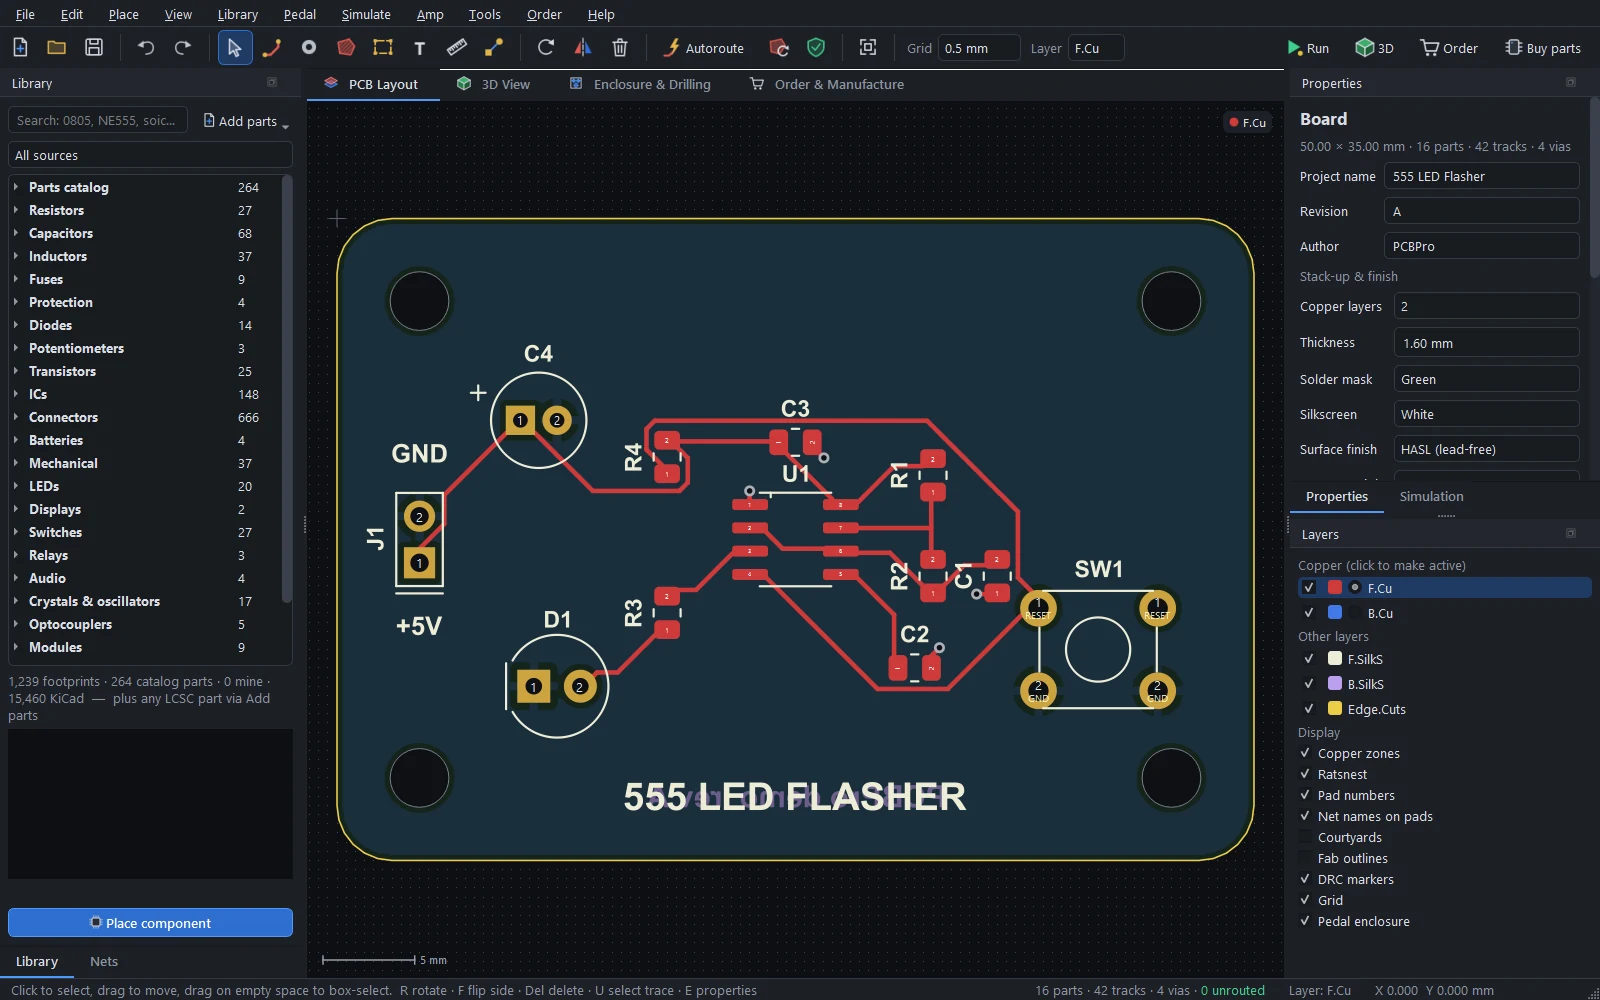
- Toolbar. New, open and save, undo and redo, the editing tools, Autoroute, refill zones, DRC, fit, the grid and the active copper layer. On the right: Run (the simulation), 3D, Order and Buy parts.
- Tabs. PCB Layout is the editor. 3D View is the real-time 3D board. Enclosure & Drilling is for pedals: the drill template for the box. Order & Manufacture checks the board against each fab and exports the files.
- Library (left). One search box over every part: the 1,200+ built-in footprints, about 265 catalogue parts by manufacturer part number, your own parts, and the 15,000+ footprints of the KiCad library once you've downloaded it. The Nets tab next to it lists every net.
- Properties (right). The selected part, track, via, zone or text, or the board when nothing is selected. The Simulation tab next to it controls a running simulation.
- Layers (right). Which copper layer is active, which layers show, and display options: zones, ratsnest, pad numbers, net names on pads, courtyards, DRC markers, the grid and the pedal enclosure.
- Status bar. What the current tool does, the part and track counts, how many connections are still unrouted, the active layer and the cursor position in mm.
Every panel is a dock: drag it by its title to move it, or bring back a closed one from View.
Moving around#
| Do this | To |
|---|---|
| Wheel | Zoom at the cursor |
| Middle-drag, right-drag or Space + drag | Pan |
| Home | Fit the board in the window |
| L, Page Up, Page Down | Change the active copper layer |
| F3 | Switch to the 3D view and back |
A board in six steps#
- Start a board. File › New board… (Ctrl+N): a name, a size preset or your own width and height, the corner radius, 2 or 4 copper layers and the thickness. You can change all of it later with Tools › Board size…, or draw any outline with the Board outline tool (B).
- Place parts. Search the Library ("NE555", "0805", "usb c", "jst ph 4"), pick one and click Place component or press P, then click on the board. R rotates, F flips the part to the other side.
- Connect them. PCBPro works from the board: there is no separate schematic. Use the Connect tool (N) to click a pad and then another to put them on one net, or type a net name into a pad's field in Properties. Thin lines (the ratsnest) show the connections still to route.
- Route. Press X and click from pad to pad for 45° tracks (V drops a via and changes layer, W changes the width, / the corner posture), or let Autoroute (Ctrl+Shift+A) do it.
- Check it. Tools › Run DRC (F8) lists clearance problems, shorts, thin tracks, small drills and annular rings, copper too close to the edge, overlapping courtyards and unrouted connections. Click one to zoom to it. Press F3 to look at the board in 3D, and F5 to run the circuit.
- Order it. The Order & Manufacture tab compares JLCPCB, PCBWay, OSH Park and AISLER, checks your board against each one, exports Gerbers, drill files, BOM and pick-and-place, and opens the fab's upload page. Buy parts makes the shopping list. See Manufacturing and ordering and Buying components.
Save with Ctrl+S. Projects are .pcbpro files (JSON), one file per board.
Where things are kept#
| What | Where |
|---|---|
| Your projects | Wherever you save them. The default folder is Documents\PCBPro. |
| Exports (Gerbers, drills, BOM, CPL, drill template) | A <project>_fab folder next to the project, unless you choose another. |
| My library (imported and wizard parts) | Documents\PCBPro\library, one JSON file per part. You can share them. |
| The LCSC download cache | Documents\PCBPro\library\.cache\lcsc |
| The KiCad library, if downloaded | Documents\PCBPro\kicad-footprints |
| Settings (window layout, recent files, audio devices, cabinets) | Windows registry, HKEY_CURRENT_USER\Software\PCBPro |
Where next#
- Tutorial: your first pedal: a pedal from the enclosure to the order, in about 45 minutes.
- The layout editor: every tool, routing, pours, net classes and the design rule check.
- Guitar pedals, the Amp Designer and high-gain amps and pedals.
- Running the board and playing guitar through it.
Something wrong or missing on this page? Edit it on GitHub.